Sending a little love – Sunny Studio

I had some fun creating this card using the Sunny Studio Sending My Love stamp set. This set has lots of sweet critters, but I concentrated on the mailbox for this one.

Sunny Studio Sending a little love | Marion Vagg

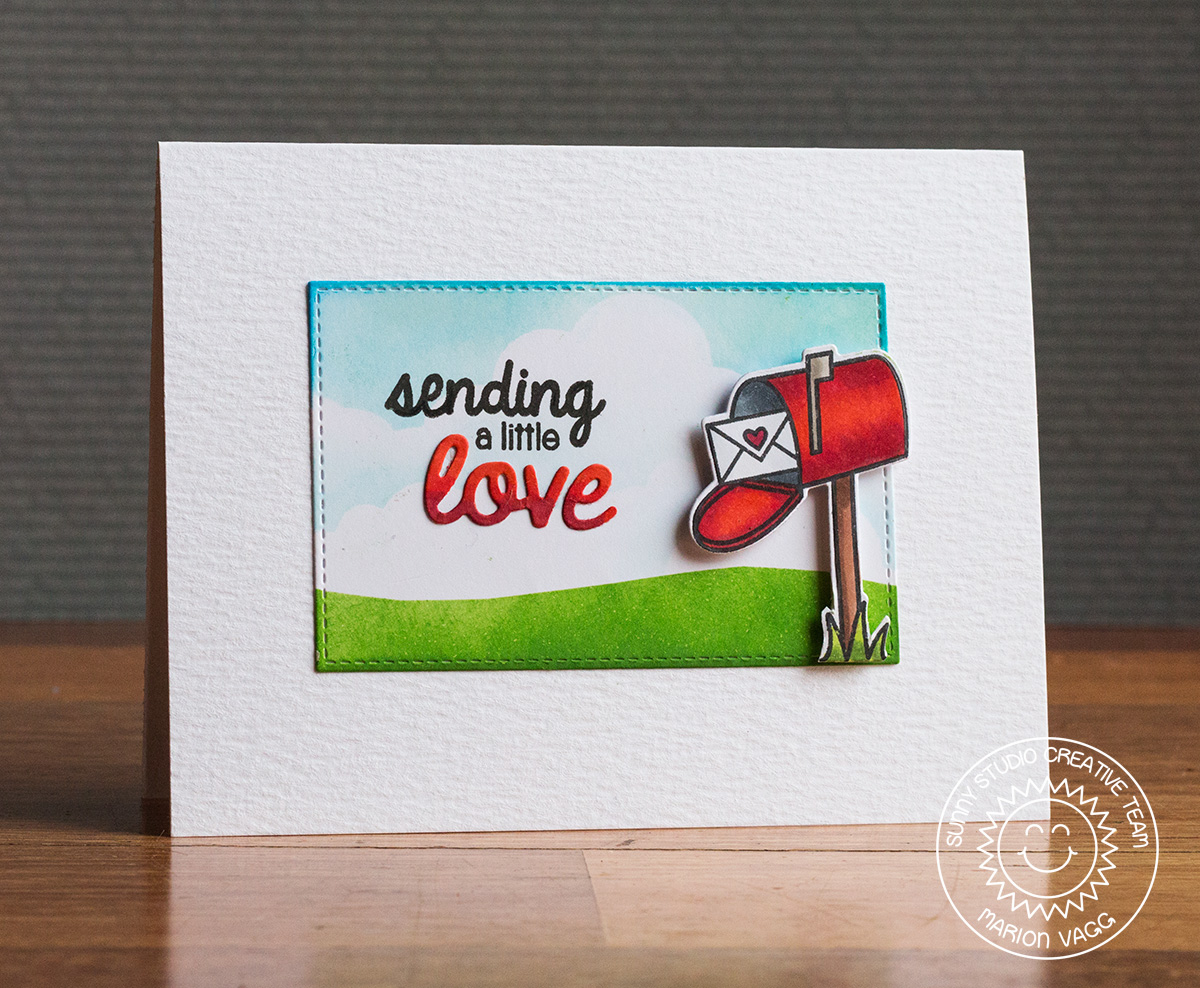
I created some masks out of Inkadinkadoo masking paper for the clouds and the grass and then sponged on some distress ink (Tumbled Glass, Peacock Feathers and Mowed Lawn). All the images are from the Sending my Love set, except the Love word sentiment which is from the Furever Friends die set.

SS Sending a little love detail | Marion Vagg

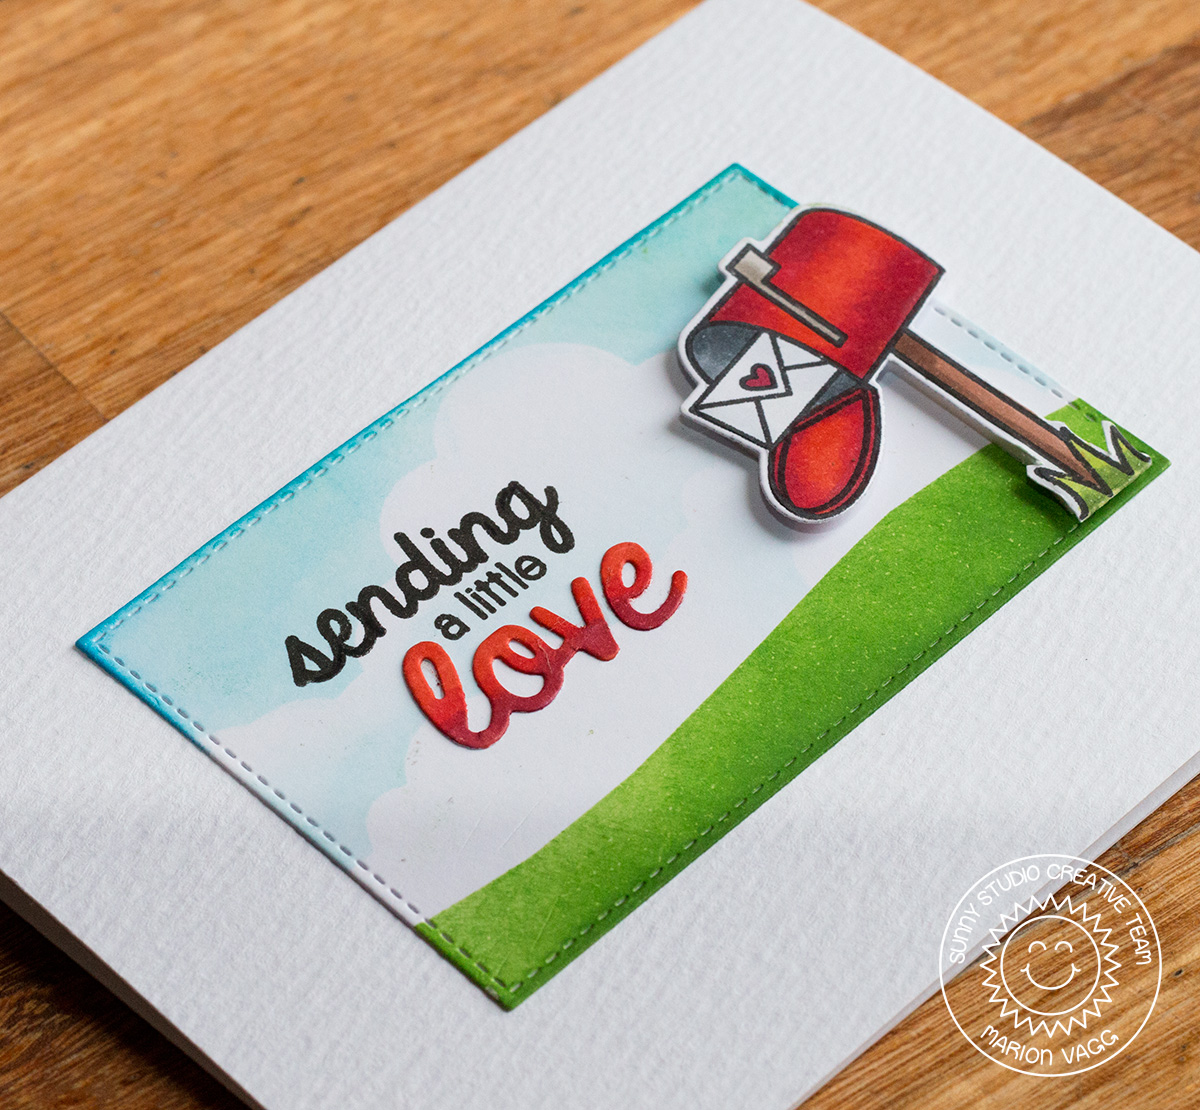
I wanted some texture on the card base (to add some interest to a rather CAS card), and the best I could find was some Tim Holtz Distress watercolour card stock.

Supplies

Stamps: Sunny Studio Sending My Love stamp set

Card: X-Press It Blending card, Tim Holtz watercolour card stock

Ink: VersaFine – Onyx Black ink, VersaFine Onyx Black ink, Distress ink – Tumbled Glass, Mowed Lawn, Peacock Feathers

Other Supplies: Copic markers, Foam dimensionals, MFT Stitched rectangle Stax, Cuttlebug, Sunny Studio Furever Friends die, Sunny Studio Sending My Love die, Ink blending tool, Inkadinkadoo Masking paper

Thanks for stopping by,

Marion

Read More

I Love You – Sunny Studio

Hello! How has your week been? School started back this week. Can’t believe my kiddos are in Yr 1 and Yr 4.  I’m also back in the classroom. I have a lovely class and am excited about the new year ahead – although I need a few more hours in the day to get everything done. Too much to do, not enough time. Can you relate?

Anyway I have a new card up on the Sunny Studio blog. Rather clean and simple, but perfect for that someone special. I am loving the new stitched heart dies and I created my own sentiment with the Sweet Script stamp set. The banner is from the Sunny Border stamp set and it too has coordinating dies.

Sunny Studio - I Love You | Marion Vagg

When I first made this card it looked very flat to me – something was missing. So I left it and walked away. I then had the idea to add some subtle shading with Copic Markers to the banner, and it was just what it needed – oh and the heart needed a coat of Wink of Stella as well!

Sunny Studio detail | Marion Vagg

Supplies

Stamps: Sunny Studio Sweet Script stamp set

Card: X-Press It Blending card, Co-ordinates card stock – Grey

Ink: Memento Tuxedo Black ink, Hero Arts Shadow Ink – Raspberry Jam, Distress Ink – Festive Berries

Other Supplies: Sunny Studio Sunny Border Die set, Sunny Studio Stitched Heart die, Cuttlebug, Copic markers,  Blending tool, Foam dimensionals, Wink of Stella glitter brush pen (clear)

Thanks for stopping by,

Marion

Read More

Hello – Sunny Studio

Hello. I hope you are having a great day. I’m popping in to share two cards that are also over on the Sunny Studio blog. These cards use the Backyard Bugs stamp set – another fun and cute set to create with.

I’ll be honest with you here – this first card took me about 5 attempts! I had an idea and it took me a little longer than I had hoped to get there. But get there I did. I must be getting old!
To start with a partially die cut a circle (leaving the bottom of the circle uncut). Next, with some stamping and masking, I stamped my little scene. From there, I used my scissors and cut around the toadstool house to create the cut-a-way section. I blended in some ink on the base card with Salty Ocean distress ink and then popped the front panel up with some 3D mounting foam. Easy! (Hindsight is a wonderful thing!)

SS Hello | Marion Vagg

The next card is pretty much the same, except I stepped the process up and created a shaker card.

SS Shaker hello | Marion Vagg

SS Shaker hello detail | Marion Vagg

Which one do you prefer? We are divided in my house. My husband likes the first one better, but my daughter loves the shaker card!

Supplies

Stamps: Sunny Studio Backyard Bugs stamp set

Card: X-Press It Blending card, SSS blue card stock (Audrey blue)

Ink: VersaFine – Onyx Black ink, VersaFine Onyx Black ink, Distress ink – Salty Ocean

Other Supplies: Copic markers, Prismacolor pencils, Gamsol, Blending tool, Foam dimensionals, Spellbinders Circle die, Cuttlebug, Sunny Studio Backyard Bugs die, Various sequins (Simon Says Stamp, Martha Stewart), Ink blending tool

Thanks for stopping by,

Marion

Read More

Hugs – Jane’s Doodles

Jane's Doodle Banner

I have another Jane’s Doodle card to share with you today using the newly released Love Birds set. Such a fun set to play with. For the sun rays in the background, I used a SSS die and an embossing mat to create the impression. Just another technique to use to get more use out of your dies.

JD Hugs | Marion Vagg

Supplies

Stamps: Jane’s Doodles Lobe Bird stamp set

Card: X-Press It Blending card, SSS yellow card stock

Ink: Memento – Tuxedo Black ink, VersaFine – Onyx black ink

Other Supplies: Copic Markers, Wink of Stella clear glitter brush pen, Mounting Foam, Simon Says Stamp Full card Sunshine die, Embossing mat, Cuttlebug, Spellbinders circle die, Ranger Enamel Accents – black.

Short and sweet from me today,

Marion

Read More

Snowflakes – Sunny Studio

Happy Friday! School is out and I’m on holiday for 6 weeks! Hopefully I will be able to catch my breath now. The last month has just been a whirlwind of activity.

Well today I have a Sunny Studio card to share with you using another one of Mendi’s cute penguin sets called Snow Kissed. For something a little different I decided to create a window card (but I always find these so hard to photograph!) To create the window, a partially die cut a circle and then created the flat bottom with my craft knife and a ruler.

The penguin was stamped and then die cut with the Snow Kissed dies. I made the window just big enough so that I could secure the penguin both at the top and bottom.

SS Snowflakes | Marion Vagg

For a subtle pattern on the card front, I stamped the snowflakes stamp in Versamark ink and added some snowflake dies from the Snow Kissed die set.

SS Snowflakes detail | Marion Vagg

The image is coloured with Copics markers and I added a white piece of paper to the inside of the card, so that when it is closed, white peeks through.

SS Snowflakes detail 2 | Marion Vagg

Supplies

Stamps: Sunny Studio Snow Kissed stamp set

Card: X-Press It Blending card, Coordinates – Grey card stock

Ink: Memento ink – Tuxedo Black,  Versmark watermark ink

Other Supplies: Copic markers,  Sunny Studio Snow Kissed dies, Cuttlebug, Anti static pillow, Hero Arts white embossing powder, Heat tool, AnnaBelle Stamps small clear sprinkles, Liquid adhesive

That’s all from me today. Thanks for visiting,

Marion

Read More

Thankful For You – Sunny Studio

Hello. I hope you are having a great week. Today I’m sharing some tags that are up on the Sunny Studios Blog using the Harvest Happiness stamp set and the coordinating dies.

I love making tags as they are quick and easy projects. We don’t have Thanksgiving in Australia, but I love the idea of taking time out to be thankful for the many blessings in our lives. Tags are a really simple way to say thank you and easy to attach to gifts such as a bunch of flowers or a treat bag filled with yummy goodness. Let’s face it, we all like being thanked!

SS Thankful for You | Marion Vagg

The first two tags are very similar, except the first one has a blue watercolour wash around the wreath (Salty Ocean and Peacock Feathers Distress Ink). I started the tags by water colouring a panel of Strathmore watercolour paper with different colours of distress ink (Festive Berries, Mustard Seed and Ripe Persimmon). Once dry, I used the small leaf dies from the Harvest Happiness die set, and ran them through my die cutting machine several times.

To create the wreaths, I drew a circle in pencil to act as a guide (head to the Sunny Studio blog where I show a photo of this). Before adhering the leaves into position, I stamped the sentiment.

SS Tag 1 | Marion Vagg

SS Tag 2 | Marion Vagg

I added some gems to the second wreath to add some shine.

SS Tag 2 detail | Marion Vagg

This last tag was created using the negative die cut panel from the first two tags. I did have to die cut a whole lot of white leaves which I then inlaid into the panel. It was good to make a third tag with the scraps from the first two!

SS Tag 3 | Marion Vagg

Supplies

Stamps: Sunny Studio Harvest Happiness Stamp set

Card: Strathmore watercolour paper, Black card stock, White card stock

Ink: VersaFine – Onyx Black, Versamark ink, Distress Ink – Ripe Persimmon, Festive Berries, Mustard Seed, Salty Ocean, Peacock Feathers

Other Supplies: Sunny Studio Harvest Happiness dies, Penny Black Tagged die, Cuttlebug, AnnaBelle Stamps clear Sprinkles, Glossy Accents (to adhere sprinkles), Paintbrush, Ribbon from my stash.

Thanks so much for stopping by today,

Marion

Read More